Sunday, 18 February 2018
we have lift-off
This will be a much shorter post than in previous years. Maybe a good sign as I'm too busy to write a lot as making progress on the project instead. Apologies for missing out the build-up but basically I have the first head off. My method was to remove the studs then lift the head off
Wednesday, 14 February 2018
If Mohammed don't come to the mountain...
You know the expression. Think it was around before the current Islamic issues so you don't hear it as much now but I think it was saying - if something won't happen try another approach.
Well I'm taking the heads off my engine just now to see if I can get to the bottom of the seizure-problem. It's probably pistons stuck in bores.
You may know that V12 heads are know to be difficult-impossible to remove in the conventional way - ie take nuts off and lift head off block.
Problem lies with the ten 7/16" studs that run down the middle of the block. They live in the water-jacket (unlike the other 16 per head) and the shafts become bonded to the drillings in the head. Some say it is actually the Barrs coolant additive that builds up in there.
Anyway. Ppl have tried various methods to get them off. You can read in horror online if you wish but I'm going for the gentle approach. I figure if you take all the studs out the head can't remain stuck on. It's not easy to remove the studs but I'm getting there. I'm not in any rush tbh.
So there are 26 per head
They can then be further subdivided into
Well I'm taking the heads off my engine just now to see if I can get to the bottom of the seizure-problem. It's probably pistons stuck in bores.
You may know that V12 heads are know to be difficult-impossible to remove in the conventional way - ie take nuts off and lift head off block.
Problem lies with the ten 7/16" studs that run down the middle of the block. They live in the water-jacket (unlike the other 16 per head) and the shafts become bonded to the drillings in the head. Some say it is actually the Barrs coolant additive that builds up in there.
Anyway. Ppl have tried various methods to get them off. You can read in horror online if you wish but I'm going for the gentle approach. I figure if you take all the studs out the head can't remain stuck on. It's not easy to remove the studs but I'm getting there. I'm not in any rush tbh.
So there are 26 per head
- 12 x 3/8" thick (the plain nuts for those take 9/16 AF spanner)
- 14 x 7/16" thick (the domed nuts for those take an 11/16 AF spanner)
They can then be further subdivided into
- likely to be corroded: the 10 x 7/16" that run down middle
- won't be corroded: the 12 x 3/8 that run on either side of the head & the 4 x 7/16 at front and back of the head
Then there is sub-division for accessibility
- ones that you can get to directly from above: all the 7/16 & the 6 x 3/8 that are on outer edges of head
- one that you can't reach from above: 6 x 3/8 on inboard side of head
So how do you get them out? Well the easiest way is to lock two nuts onto each stud and unwind them but there isn't a great deal to get hold off on some groups and on others this doesn't seem to give enough purchase to unfasten them.
I got the outer 3/8 ones out and the clean 7/16 ones(2 at front and 2 at back of each head). So that's 10. I can't get sufficient access to the inner 3/8 studs but it's unlikely they'll pose an obstacle once all the others are out so I've given up on them. That leaves the ten water-jacket studs. I've got two out by welding a nut onto the top of them and them removing as if they were bolts. It works well but you waste a nut and a stud each time you do it.
Thing is that doesn't really matter as the studs are not in great condition and would be safer to replace them anyway.
 |
| large bar & extensions needed to get things moving |
 |
| bottom part of stud is hard to get out top off head. powder coming off due to rotating motion |
 |
| looked like chocolate shavings after a while |
 |
| and it's out |
 |
| bottom threads are remarkably clean |
 |
| worst corrosion seems to be on top threads |
 |
| temporary wells created round outer studs with silicon to hold penetrating fluid |
 |
| inner studs already have suitable wells round them |
Saturday, 10 February 2018
post-seizure momentum
Well I'm back.
Have not re-read this Blog but am pretty sure I haven't posted that I discovered the engine was seized. This brought the project to a standstill basically. I also got sacked from my job of 23 years around that time.
Come 2015 I was labouring for an acquaintance for about £50 a day but somehow had the spare cash to buy a used V12 engine for £450. In my haste to buy it I didn't check the engine number properly and my miracle-find was actually no good. It was an 1983 HE engine and they apparently aren't compatible with the carburettor parts of my original engine. I had a notion that I could've made one good engine out the two or bolted by intake/exhaust parts to the 'new' engine.
So another couple of years passed. I'm working for myself just now so always skint and always working and never work on my projects.
New year 2017/18 brought a determination to get things moving again. Plus a week or two with no work so I'm in the process of trying to un-seize the original engine.
Before stripping it I'm using the HE as a Guinea-Pig so I don't break anything on the original. So far everything has went fine. The HE top-end came off with no drama and I'm at that stage with the original now. The heads aren't as willing to come off this one tho so am removing the studs gradually so I can just lift them away without having to bang or pull or lever them off
NB when I refer to RH & LH parts of the engine am meaning as viewed from front of engine whist I work on it. If you were in the car it would be reversed. The manuals follow this convention
 |
| LHS cylinder-head coming off HE engine. cardboard packing was needed to stop front dropping down as other end was lifted |
 |
| rear end of LHS head |
 |
| HE heads have quite deeply-recessed exhaust valves |
 |
| both HE heads off |
 |
| carburettor engine is still in car. here RHS tappets are being numbered before removal |
Thursday, 11 April 2013
randoms
I have neglected updating this for a while. Not because nothing is being done on the car but more because it's so much easier to put my updates on an internet forum (RetroRides). The old Blogger tool isn't as user friendly I find (although it is getting better) and they are seen by far fewer people but the downside of an internet forum is that your mammoth efforts are 'yesterday's chip papers' within a few days while the Blog sits there forever on the last entry you made. So there are pros and cons and it's worth doing both I reckon.
Situation just now is that the metal repairs on the body are effectively done and I'm at the stage of doing numerous refurbishment jobs around the car. From brake calipers to headlining with fuel pipes in between.
It would take an inordinate amount of time to post it all chronologically so I'll just put up some nice pictures instead.
 |
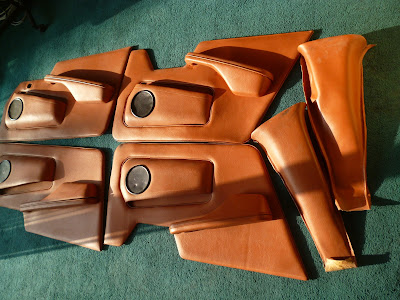
| all the door trims laid out for inspection as they should be going back in the car soon |
 |
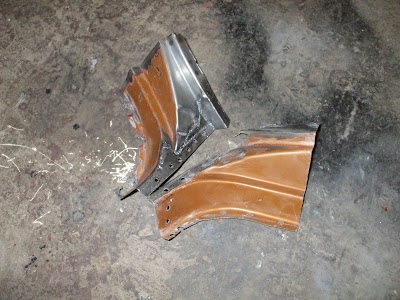
| detail of reverse side of a cant rail which is being re-trimmed in Alcantara |
 |
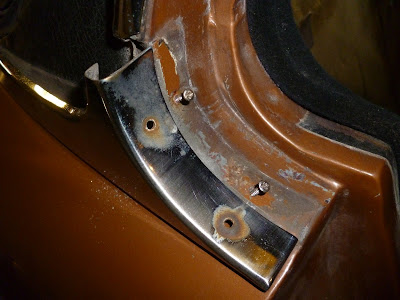
| B-post trim plates got a coat or two of paint prior to re-trimming |
Monday, 13 August 2012
purple patch
A small update and something a bit different from body repairs now.. Also with a new Blogger enhancement it appears you can now click on any picture then view them all full screen as a slideshow,
I got the patch fixed on the C pillar and it went quite well. No problem at all really. The other side of the car isn't as bad so I need to decide whether or not to just paint it and put ths glass back in or sandblast the surface rust off.
At this stage in the build I'm not keen on getting the blaster out again due to the mess it creates. We shall see.
I have also moved onto the IRS and spent over £50 getting it shotblasted and powdercoated. Looks nice tho.
 |
| powdercoated IRS cage |
 |
| waiting patiently for all its fittings to go back on |
 |
| all rusty metal filed away |
 |
| patch shaped up with 'fingers' to stop it dropping into hole |
 |
| welds complete |
 |
| welds smoothed down |
 |
| similar technique used on little hole further in |
 |
| finished and trim back on. just needs paint |
Friday, 18 May 2012
convertible?
Hi watchers
I've not updated the Blog recently but have been working away on the car and the body repairs ar over 90% done.
Would take quite some time to post all the progress in the correct order so....why not jump forward to the present!?
When I first bought the car my father pointed out some rust bubbles at the base of the C pillar and said something like 'yeah, once a car goes there its finished'. I remember at the time thinking 'what do you expect for a £250, 30 year old car' and never envisaged the day I'd tackle that repair.
My plan at first was to get it MoT-able.
Well the other day I found myelf running out of bits to repair and within 10 minutes the rear screen was out. The rust isn't really that bad and I should be able to make a nice repair within a day or two on both sides.
I thought the car looked a bit like a convertible with the screen out so here are a few pics and hopefully next instalment will see the repairs in completion
 |
| passenger side showing large bubble where chrome trim/vynil/rubber meet plus some rust towards front |
 |
| driver's side not as bad but still a bit suspect |
 |
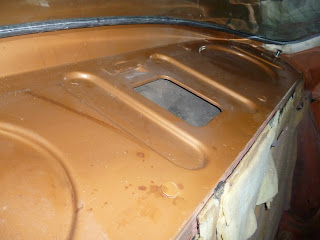
| parcel shelf trim removed also gives good access to screen rubber |
 |
| a little push on top corner moved it out easily. chrome finisher and rubber insert were removed first |
Tuesday, 22 November 2011
a jumble
Ok.....things have been quiet on the blog front but the upside of that is that they have been busy on the VDP front! I've made lots of progress but shied away from updating the blog as I wanted to do it in chronlogical order and not miss anything out so I'm getting a huge backlog of pictures and words building up.
Realistically I'll probably not go back and post on all the work in the fashion I previously did so here's a quick summary and lots of pics.
I've also just noticed that there has been an 'enhancement' on the picture aspect: if you click on any of the pics within a post you are then presented with a gallery of all the others in the same post.
work done includes:

very pleasing, visually, the re-instated curve of the RHS fuel tank closing panel


similar to driver's side. repair done to curve. this side of car less rusty for some reason. patch also needed at bulbous area for fuel tank mount-bolts as metal was thin

wider angle of same area after sandblasting, patch repairs and priming. top of patch still needs to be welded

driver's side area before any work. looks reasonably sound

curved patch on front face done a long time ago but blasting revealed repairs needed at concave pressing towards rear and in front cornert and small patch above top slotted hole curved face

areas above will not be blasted or painted as have very little corrosion and will be flooded with modern wax/rust-proofer solutions

feet can be welded back in once repairs complete

rear seats stored in rafters and covered still picked up a worrying amount of dust etc

centre, cleaned up easily with Turtle Wax leather cleaner, contrasts against outer area

seats stored in rafters looked to have been damaged badly

cleaned seats look great. difference between leather facings and synthetic rear/sides is evident
Realistically I'll probably not go back and post on all the work in the fashion I previously did so here's a quick summary and lots of pics.
I've also just noticed that there has been an 'enhancement' on the picture aspect: if you click on any of the pics within a post you are then presented with a gallery of all the others in the same post.
work done includes:
- passenger side outer and inner arches welded in place
- tops of inner and outer sills all spot welded together
- bottoms of outer sills plug welded to floor edges
- all 4 sill end caps in place including troublesome driver's side rear where 'window' was larger than cap
- sill tread plates re-fitted in exact right locations
- repairs to fronts and sides of exhaust tunnel panels
- rear valance protective primer removed and re-primed with further trimming to it and original body, prior to final fitting
- sand blasting of exhaust tunnel panels
- driver's side sill fitting problem sorted out
- upholstery cleaned and re-fitted
- rear wing bumper locating brackets removed for rust removal and repairs to wing lower edge

very pleasing, visually, the re-instated curve of the RHS fuel tank closing panel

surface rust in these areas blasted off. also provides good key for primer/paint

similar to driver's side. repair done to curve. this side of car less rusty for some reason. patch also needed at bulbous area for fuel tank mount-bolts as metal was thin

wider angle of same area after sandblasting, patch repairs and priming. top of patch still needs to be welded

driver's side area before any work. looks reasonably sound

curved patch on front face done a long time ago but blasting revealed repairs needed at concave pressing towards rear and in front cornert and small patch above top slotted hole curved face

areas above will not be blasted or painted as have very little corrosion and will be flooded with modern wax/rust-proofer solutions
corrosion on rear wing/bumper blades
cut made at corner. easier than taking more panels off at rear to free curved section of bumper bracket
taking off bumper bracket also exposes hidden part of wing for blasting/repairs
brackets being blast cleaned

feet can be welded back in once repairs complete

rear seats stored in rafters and covered still picked up a worrying amount of dust etc

centre, cleaned up easily with Turtle Wax leather cleaner, contrasts against outer area

seats stored in rafters looked to have been damaged badly

cleaned seats look great. difference between leather facings and synthetic rear/sides is evident
outer wing repair panels seam welded in. distortion hard to avoid
standard repair panel looks rather flared here
passenger side inner and outer sill being levered & clamped together for final spotwelding
front of driver's side inner sill. repaired a long time ago but recently given a lick of primer
nice to see sills in place again with tread plates re-fitted
Subscribe to:
Comments (Atom)


